Transitioning to a premium robot vacuum and mop combo equipped with a fully automated base station is an incredible lifestyle upgrade. It promises to eliminate the daily, messy chore of hauling heavy water canisters back and forth to your sink. However, transitioning from a standalone water tank to a hardwired plumbing connection introduces an entirely new set of technical challenges. Many homeowners find themselves stuck in a frustrating cycle of confusion and anxiety. They worry about accidentally flooding a kitchen cabinet, messing up residential plumbing lines, or creating hidden pipe leaks behind a bathroom wall.
This hesitation is entirely justified. Standard instruction sheets frequently gloss over vital plumbing dynamics like residential waterline pressure, siphon feedback loops, and tight pipe radius kinks. To completely automate your floor mopping loops without risking property damage, you must approach this setup with absolute technical precision. This comprehensive installation guide delivers an expert plumbing blueprint for your automated base station. You will learn how to choose the ideal location, configure clean feed inputs and grey wastewater drainage paths safely, and understand why a high-suction cordless stick vacuum remains a necessary companion tool to maintain your home cleaning system.
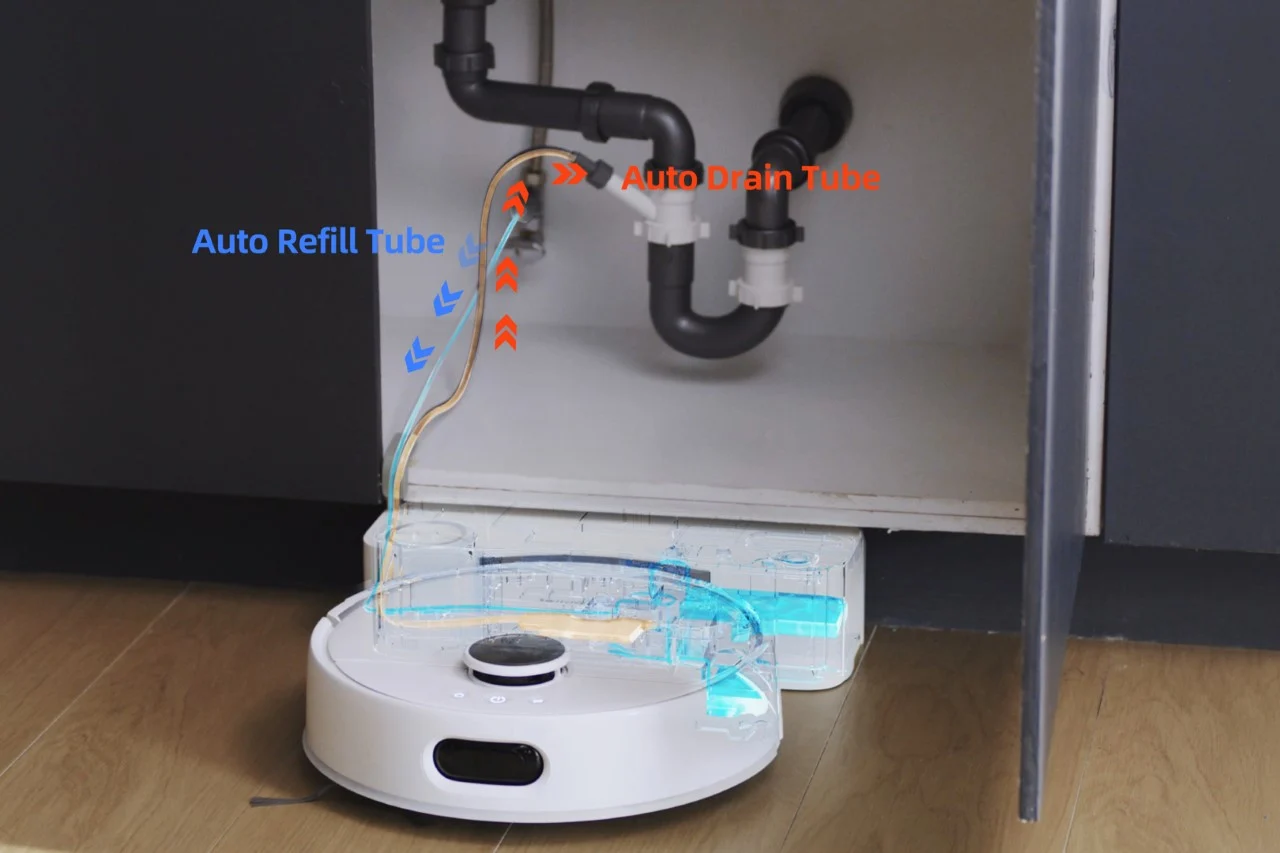
![switchbot_s10_ifa_5]()
Quick Answer
To install a water pipe for a robot cleaner, connect a 3/8-inch or 1/2-inch brass plumbing T-valve to your sink’s cold water line and run a 1/4-inch PE tube to the base station intake. Insert the wastewater line into a drain pipe with a physical air gap, ensuring an inline pressure-reducing valve drops input velocity below 45 PSI.
Key Takeaways
Pressure Management Control: You must install an inline pressure-reducing valve (PRV) if your home line pressure exceeds 50 PSI to prevent cracking the base station's internal micro-solenoids.
The Square-Cut Law: Never cut polyethylene (PE) tubing with standard scissors; use a dedicated pipe cutter to achieve a perfect 90-degree angle, preventing O-ring distortion inside quick-connect fittings.
Siphon Feed Isolation: Always include a physical air gap or non-return check valve on the grey water drainage line to stop sewer gases from siphoning back up into the station housing.
The Dry-Surface Companion: Plumbed robot base stations manage daily wet floor mopping seamlessly, but clearing dust from above-floor moldings, stairs, and tight utility corners requires a high-suction cordless stick vacuum.
Leak Notification Architecture: Placing a smart electronic water leak sensor beneath the plumbing base station cabinet provides immediate automated smartphone safety alerts if a tube connection weakens over time.
1. Architectural Location Selection: Mapping Your Base Station Water Access
Before uncoiling any pipes or drilling holes through your interior cabinetry, you must carefully select the installation site. Your chosen location must satisfy specific architectural and plumbing constraints to ensure proper operation.
Selecting a poor location will complicate pipe routing, disrupt gravity-fed drainage lines, and increase the risk of accidental water damage over time.
The Proximity Rule Matrix: The base station must sit on a completely flat, level floor within 15 lateral feet (approx. 4.5 meters) of a residential cold water supply line and a wastewater drain pipe. It must also sit within 5 feet of an unswitched, standard electrical wall outlet.
The Kitchen Sink Cabinet Hub: This is the most popular installation site. It offers direct, low-stress access to the cold water shutoff angle valve and the kitchen sink's P-trap drain line. The primary drawback is that you must drill a 1.5-inch hole through the side of the wooden cabinetry base to route the clean and dirty polyethylene (PE) lines out to the robot's base station.
The Laundry Room Washer Stack: Tapping into the laundry room utility boxes is an exceptional alternative. It provides open water line valves and an exposed washing machine standpipe for wastewater drainage, completely removing the need to drill into expensive furniture wood.
The Bathroom Vanity Loop: Excellent for compact floor plans or single-story layouts. You can source clean water directly from the bathroom sink lines and route the grey water drain tube into the vanity's sink pop-up drain branch using a specialized slip-joint branch tailpiece.
2. The Complete Plumbing Component Checklist: Diameters & Valves
Attempting to connect an automated smart appliance using mismatched adapters or low-grade vinyl aquarium hoses will lead to plumbing failures. Robot vacuum auto-refill modules utilize high-density, semi-rigid plumbing lines that require specialized hardware interfaces.
Always check your home tool kit against this certified industrial component checklist before beginning your installation project:
Plumbing Component Name | Standard Size / Specification | Primary Mechanical Function | Associated System Safety Risk |
Brass Compression T-Valve | 3/8" x 3/8" x 1/4" Thread | Splits the main cold water feed to create an independent branch line. | High (Thread mismatch can cause immediate structural leaks). |
Polyethylene (PE) Tubing | 1/4" Outer Diameter (O.D.) | Carries clean water under pressure from the wall to the base station. | Moderate (Low-grade plastic line can rupture over time). |
Pressure-Reducing Valve (PRV) | 1/4" Quick-Connect Inline | Drops incoming household water pressure down to a safe 30–40 PSI ceiling. | High (Omitting this part can crack internal station solenoids). |
Locking Safety Clips | 1/4" Horseshoe Style | Locks the PE tubing securely inside quick-connect fittings. | Moderate (Tubing can blow out under sudden pressure spikes). |
Air Gap Breaker fitting | 1/2" to 1/4" Barb Interface | Creates a physical air gap on the drain line to stop wastewater backflow. | High (Omitting this allows toxic sewer gas into the home). |
3. Step-by-Step Clean Water Feed Installation Protocol
Tapping into your home's main cold water line must be executed in a specific, careful sequence. Rushing the installation or failing to clear line pressure can cause immediate water spraying, cross-threaded brass joints, and hidden structural dampness behind your drywall.
Follow this step-by-step plumbing sequence to guarantee an airtight, high-performance clean water connection:
1.Isolate the Cold Water Angle Valve:Time: 2 Minutes。
Locate the cold water shutoff angle valve beneath your sink cabinet (typically the pipe on the right side). Rotate the oval metal handle fully clockwise until it stops. Open the sink faucet tap completely to bleed away any remaining line pressure, and place a small towel under the valve body.
2.Thread the Brass T-Adapter Valve:Time: 5 Minutes。
Use an adjustable wrench to loosen and unscrew the flexible metal braided faucet line from the top of the angle valve thread. Thread your brass compression T-adapter valve directly onto the angle valve. Tighten it firmly by hand, then apply an extra 1/4 turn with your wrench. Reattach the main faucet line to the top of the T-valve.
3.Install the Inline Pressure Valve:Time: 3 Minutes。
Measure out a 6-inch segment of your 1/4-inch PE tubing. Use a sharp pipe cutter to make a perfect 90-degree square cut across the tube line. Insert one end into the 1/4-inch output port of your new brass T-valve. Insert the opposite end into the intake arrow port of your inline Pressure-Reducing Valve (PRV), pushing hard until the tube seats past the internal O-ring.
4.Route the Tubing and Seat Lock Clips:Time: 5 Minutes。
Run the remaining length of 1/4-inch PE tube from the output side of the PRV through your cabinet holes out to the back of the robot base station. Insert the line straight into the station's Clean Water Inlet port. Slide plastic horseshoe locking clips beneath the collar of every quick-connect fitting to ensure the tubing can never shake loose under pressure.
4. Wastewater Drainage Configuration: Air Gaps and Gray Water Isolation
Routing the clean water feed is only half of the installation equation; you must also engineer a safe drainage path to handle the grey water generated during the mop washing cycles. Because gray water contains hair, floor grease, and biological dirt, disposing of it improperly can create a major sanitation hazard.
Understanding the physics of plumbing drainage ensures your home remains free of toxic sewer backups and foul odors.
[Base Station Wastewater Drain] ---> 1/4" PE Drain Line ---> Drop Loop Trailing
|
[Sewer Line P-Trap] <--- Air Gap Breaker Fitting <-----------------+ (Stops Toxic Gas Siphoning)
The Danger of Direct Siphoning: Never tape or seal the robot's wastewater line directly into a household drain pipe or sewer line without protection. When a large volume of water drains through your home's pipes, it creates a powerful negative pressure vacuum inside the plumbing stacks. If your robot's line is directly sealed to the drain, this vacuum will siphon dirty sewer water and toxic sewer gases (like methane and hydrogen sulfide) backwards through the tube, contaminating your clean base station housing.
The Air Gap Breaker Mandate: To permanently isolate your smart home appliance from sewer contamination, you must integrate a physical air gap breaker fitting at the point of drainage. If routing into a laundry standpipe, suspend the 1/4-inch drain tube at least 2 inches above the top rim of the standpipe opening using a rigid plastic drop bracket. This physical gap ensures that even during a severe sewer backup, wastewater will spill out onto the laundry floor rather than traveling backwards into your robot's internal plumbing lines.
Managing Gravity Slopes: Unlike the clean water line, which moves easily under constant residential utility pressure, the base station's gray water pump only applies light pressure to flush away wastewater. The drainage line must follow a continuous, downward gravity slope from the base station to the household drain. Any severe upward loops or sagging sags in the tube line will trap heavy sludge, leading to line blockages and triggering "Wastewater Drainage Error" faults on your robot.
5. Seamless Integration: Hardwired Robot Mops vs. Cordless Stick Vacuums
As you design a modern home automation cleaning routine, it is vital to recognize that a plumbing-integrated robot vacuum-mop combo is a highly specialized single-surface tool. Hardwiring a base station into your home's water infrastructure creates a highly capable daily maintenance hub, but it does not satisfy every cleaning need across a standard household.
To truly optimize your home maintenance routine, you must combine this fixed system with a flexible, manual companion tool.
[The Smart Cleaning Matrix]
|
+---> Hardwired Plumbed Robot Mop ---> Runs Every Morning ---> Automated Wet Floor Maintenance
+---> Cordless Stick Vacuum ---> Runs Every Weekend ---> Manual Deep Detailing & Above-Floor
The Fixed Infrastructure Champion: A plumbed robot vacuum is unmatched at maintaining hard floor planes automatically. Running a hardwired machine every morning ensures that loose surface dust, muddy footprints, and light spills are swept and mopped away before they can dry into stains. Because the base station refills and flushes its tanks automatically, it operates smoothly for weeks without requiring human effort, making it the perfect tool for consistent hard-surface floor maintenance.
The Cordless Stick Detailing Solution: However, a fixed robot vacuum operates under strict physical limits. It cannot clean high window sills, dust your ceiling vents, or reach into the tight crevices directly behind its own plumbing base station cabinet. Furthermore, a robot lacks the high airflow volume required to lift deep dust out of plush carpets. A lightweight, modular cordless stick vacuum equipped with a motorized brush head and a narrow crevice tool is an essential tool to handle weekend deep cleaning sweeps, stair maintenance, and delicate above-floor dusting.
6. Pressure Testing, Calibration, and Leak Detection Verification
The final phase of any residential plumbing project centers around strict quality control. Once all lines are run and seated, rushing to push the base station back against the wall can hide micro-leaks, which can slowly rot your floorboards or warp your wooden cabinetry over time.
Follow this systematic pressure calibration routine to ensure your hardwired installation remains safe and dry for years to come:
The Incremental Pressurization Pass: Do not flip the brass angle valve wide open immediately. Rotate the valve handle counter-clockwise by just 10 degrees, allowing water to trickle into the 1/4-inch PE lines slowly. Listen carefully for the sound of rushing water. If a tube was cut unevenly or a fitting is loose, you will see immediate micro-beading drops form at the joint. If a leak appears, shut off the valve instantly, remove the locking clip, and re-cut the tube end perfectly square.
Testing Under Full Utility Load: Once the lines fill with water and remain dry, open the angle valve completely to subject the system to your home's full static line pressure. Leave the cabinet open and inspect every joint every 15 minutes for a full hour, wiping a dry paper towel along the connections to catch hidden moisture beads.
Electronic Sensor Security Layer: To guarantee long-term safety, place a smart wireless electronic water leak sensor flat on the cabinet floor directly beneath your brass T-valve and the back of the robot base station. If an internal O-ring fails or a connection weakens over a multi-year period, the sensor will detect the moisture instantly. It will trigger a loud audible alarm and send an automated notification straight to your smartphone, allowing you to shut off the water lines before any structural property damage can occur.
FAQ: Advanced Smart Appliance Plumbing & Calibration
Q: Can I tap into a hot water supply line if the cold water angle valve under my kitchen sink is blocked or frozen?
A: Absolutely not. You must never connect a robot vacuum's auto-refill intake line to a residential hot water supply pipe. The clean water lines and internal electronic solenoid valves inside a robot base station are constructed from low-density polyethylene and silicone gaskets rated for ambient cold water temperatures (typically under 35°C or 95°F). Sending hot tap water ($50^{\circ}\text{C}$ to $65^{\circ}\text{C}$) into the base station will warp the plastic water channels, melt the internal micro-filters, and permanently destroy the auto-refill module, voiding your manufacturer warranty.
Q: What happens to the plumbing system if my home experiences sub-zero winter temperatures and the pipes freeze?
A: If your robot base station is installed inside an uninsulated utility room, mudroom, or enclosed porch that drops below freezing ($0^{\circ}\text{C}$ or $32^{\circ}\text{F}$), the water inside the thin 1/4-inch PE lines will freeze and expand. This ice expansion will split the plastic tubing walls open and crack the base station's internal acrylic water manifold valves. If your pipes are at risk of freezing, you must execute a winterization routine: shut off the main brass angle valve, remove the PE tubing, and run a manual diagnostic drainage cycle to completely purge all remaining moisture from the base station's internal pumps.
Q: How far can I route the 1/4-inch PE water lines from my sink to the robot base station without causing a severe flow drop?
A: You can safely route 1/4-inch PE clean water lines up to a maximum lateral distance of 30 feet (approx. 9 meters) from your water source, provided your home's baseline water utility pressure sits at a standard 40 to 50 PSI. Running water through a narrow tube creates minor friction resistance that drops line pressure slightly over long distances. If your lateral run must exceed 30 feet to reach the robot, you should upgrade the first leg of the run to a wider 3/8-inch PE line to minimize friction, dropping down to a 1/4-inch line using a reducer fitting right at the back of the base station.
Q: Do I need to install an inline sediment water filter if my household water supply comes from a private well system?
A: Yes, if your home pulls water from a private well system or local utility lines prone to high mineral scaling, installing a dedicated inline sediment water filter is a highly recommended step. Well water frequently carries microscopic grains of abrasive sand, dissolved iron rust, and fine silt. While these tiny particulates are harmless when running a kitchen sink faucet, they will quickly collect inside the robot base station's micro-mesh intake screens. This sediment buildup blocks water flow and causes the machine to trigger automated "Clean Water Supply Shortage" error codes.
Q: Why does the base station emit a "Water Inlet Error" code even though the brass angle valve is fully open?
A: A "Water Inlet Error" code usually indicates a mechanical flow restriction, often caused by a kinked pipe or an over-activated pressure-reducing valve. Inspect the entire run of your 1/4-inch PE tubing, checking for tight bends behind the cabinetry where the line may have folded flat, blocking water flow. Also, verify that your inline Pressure-Reducing Valve (PRV) hasn't been turned down too low; if the incoming water pressure drops below 20 PSI, the base station's internal timer will log a timeout fault before the clean reservoir can fill up completely.
Q: Is it legal under standard local residential building plumbing codes to hook up a robot vacuum directly to household drain lines?
A: Yes, direct hookups are completely legal under standard Uniform Plumbing Code (UPC) guidelines, provided you include a certified non-return check valve or a physical air gap breaker on the wastewater line. Code regulations strictly prohibit any direct, airtight connection between a residential gray water source and a sewer line to prevent contaminated sewer air from entering living spaces. Utilizing an approved dish-washer branch tailpiece or a loose-fitting drop bracket over an open standpipe ensures full plumbing code compliance.
Conclusion
Hardwiring your smart robot vacuum’s base station into your home's water infrastructure is an exceptionally efficient home upgrade that replaces manual chore loops with automated convenience. To maximize the lifespan of this system, you must avoid rushed installation habits and implement a disciplined, step-by-step plumbing protocol. Be sure to drop line velocity using an inline pressure-reducing valve to protect your appliance's internal micro-solenoids, make clean 90-degree square cuts on all PE tubing to prevent O-ring leaks, and include a physical air gap breaker on your drainage lines to block sewer gases. By combining this automated mopping hub with a high-torque cordless stick vacuum to handle your above-floor detailing, you can maintain a spotless, beautiful home safely and effortlessly all year round.
About Lincinco
Lincinco (Dongguan Lingxin Intelligent Technology Co., Ltd.) is a premier global manufacturer specializing in high-performance smart appliances and fluid-dynamic home robotics. Operating from our state-of-the-art 50,000m² industrial facility, our company houses 135 high-precision injection molding machines and a dedicated 65-person R&D engineering team holding over 100 international patents. As a primary OEM/ODM development partner for leading brands like Xiaomi and Electrolux, Lincinco runs a strict 20-stage quality inspection process inside our automated testing laboratories. We specialize in perfecting high-efficiency brushless digital motors, whole-machine structural vacuum sealing configurations, and complex residential fluid dynamics, ensuring that every vacuum, smart window cleaner, and automated consumer device delivers optimized power-to-runtime performance. At Lincinco, we engineer the industrial precision needed to simplify modern household maintenance.